搜索到
7
篇与
的结果
-
 WordPress通过代码实现文章部分内容密码可见 前言今天在更新网站的时候有个新需求,需要输入密码才可以获取文章的部分内容,于是就自己捣鼓出了一点代码!{dotted startColor="#ff6c6c" endColor="#1989fa"/}第一步:PHP代码在你的主题文件 functions.php 末尾添加下面代码,最好自己写上注释的开头和结尾,以免后期混淆或者记不住改了哪里的代码。比如:############ 文章部分内容输入密码可见 开始 ########### 代码正文 ############ 文章部分内容输入密码可见 结束 ###########//文章部分内容输入密码可见 开始 // assets/css/main.min.css 也添加了css样式 /** * WordPress文章部分内容密码保护短代码功能 (自动聚焦优化版) */ function custom_password_protected_shortcode($atts, $content = null) { $atts = shortcode_atts(array('key' => ''), $atts); $password = $atts['key']; if (empty($password) || is_null($content)) { return '<p style="color: red;">错误:未正确设置密码保护内容。</p>'; } if (isset($_POST['custom_password_key']) && $_POST['custom_password_key'] === $password) { return '<div class="custom-unlocked-content">' . do_shortcode($content) . '</div>'; } elseif (isset($_POST['custom_password_key']) && $_POST['custom_password_key'] !== $password) { $error_message = '<p class="password-error">密码错误,请重试。</p>'; } else { $error_message = ''; } // 为容器添加ID用于JS定位,并在表单上添加悬停监听的基础标记 $form = ' <div class="custom-locked-content" id="custom-locked-area"> <div class="locked-message"> <svg xmlns="http://www.w3.org/2000/svg" width="16" height="16" fill="currentColor" viewBox="0 0 16 16"> <path d="M8 1a2 2 0 0 1 2 2v4H6V3a2 2 0 0 1 2-2zm3 6V3a3 3 0 0 0-6 0v4a2 2 0 0 0-2 2v5a2 2 0 0 0 2 2h6a2 2 0 0 0 2-2V9a2 2 0 0 0-2-2z"/> </svg> 此部分内容受密码保护。将鼠标移至此区域即可输入密码。 </div> <form method="post" class="custom-password-form" id="custom-password-form"> <input type="password" name="custom_password_key" placeholder="请输入访问密码" required id="custom-password-input" /> <button type="submit">解锁内容</button> </form> ' . $error_message . ' </div> '; return $form; } add_shortcode('secret', 'custom_password_protected_shortcode'); /** * 加入自动聚焦的JS代码 */ function add_auto_focus_script() { ?> <script type="text/javascript"> document.addEventListener('DOMContentLoaded', function() { const lockedArea = document.getElementById('custom-locked-area'); const passwordInput = document.getElementById('custom-password-input'); if (lockedArea && passwordInput) { // 鼠标悬停在保护区域时,聚焦到输入框 lockedArea.addEventListener('mouseenter', function() { passwordInput.focus(); }); // 可选:为了让用户体验更流畅,可以防止因焦点离开导致的小问题 // 例如,当鼠标在表单内移动时,保持输入框处于可输入状态。 lockedArea.addEventListener('mouseleave', function(e) { // 简单的判断:如果鼠标离开去了非表单区域,可以不处理焦点 // 如果要去往按钮或其他地方,则不清除焦点 if (!lockedArea.contains(e.relatedTarget)) { // 这里可以选择不做任何操作,或者 blur(失焦) // passwordInput.blur(); } }); } }); </script> <?php } add_action('wp_footer', 'add_auto_focus_script'); //文章部分内容输入密码可见 结束第二步:css样式到WordPress的主题样式文件 main.css 样式文件里添加下面代码;如果是第三方主题有可能会改名,比如 main.min.css 等,主题样式文件一般位于主题目录下 /assets/css 文件夹。 /*e-secret 文章部分内容输入密码可见css 开始*/ /* 受密码保护内容的样式 */ /* 为密码保护容器添加悬停效果,提示用户可交互 */ .custom-locked-content { background: linear-gradient(135deg, #f5f7fa 0%, #c3cfe2 100%); padding: 25px; border-radius: 12px; border-left: 5px solid #3498db; text-align: center; margin: 25px 0; box-shadow: 0 4px 12px rgba(0, 0, 0, 0.05); transition: all 0.3s ease; cursor: pointer; /* 暗示此处可点击/交互 */ } /* 悬停时增强容器视觉效果 */ .custom-locked-content:hover { box-shadow: 0 6px 20px rgba(0, 0, 0, 0.1); transform: translateY(-2px); border-left-color: #2980b9; } /* 锁定消息样式 */ .custom-locked-content .locked-message { font-weight: 600; color: #2c3e50; margin-bottom: 15px; font-size: 1.05em; } /* 密码表单样式 */ .custom-password-form { display: flex; justify-content: center; gap: 10px; margin-top: 15px; } /* 输入框获得焦点时的样式(无论是自动聚焦还是手动点击) */ .custom-password-form input[type="password"] { padding: 12px 16px; border: 2px solid #dce1e6; /* 初始边框稍粗 */ border-radius: 6px; width: 250px; font-size: 15px; transition: all 0.3s ease; } /* 当输入框通过JS自动聚焦或用户点击时,改变样式 */ .custom-password-form input[type="password"]:focus { border-color: #3498db; outline: none; box-shadow: 0 0 0 3px rgba(52, 152, 219, 0.2); background-color: #fff; } /* 按钮样式 */ .custom-password-form button { background-color: #3498db; color: white; border: none; padding: 12px 24px; border-radius: 6px; cursor: pointer; font-size: 15px; font-weight: 600; transition: background-color 0.3s ease; } .custom-password-form button:hover { background-color: #2980b9; } /* 移动端适配 */ @media (max-width: 600px) { .custom-password-form { flex-direction: column; } .custom-password-form input[type="password"] { width: 100%; } } /* 解锁后内容的专属样式 */ .custom-unlocked-content { margin: 2.5rem 0; padding: 2rem; background: linear-gradient(135deg, #f0fff4 0%, #f8fdf9 100%); /* 浅绿色渐变背景,暗示安全/成功 */ border: 1px solid #c6f6d5; /* 柔和的绿色边框 */ border-left: 5px solid #38a169; /* 左侧粗边框,作为醒目标识 */ border-radius: 12px; /* 统一的圆角 */ box-shadow: 0 4px 12px rgba(0, 0, 0, 0.05); /* 轻微的阴影提升层次感 */ position: relative; /* 为可能的装饰性元素定位做准备 */ animation: fadeInUp 0.5s ease-in-out; /* 解锁时的浮现动画 */ } /* 可选:在解锁内容区域顶部添加一个“已解锁”小标签 */ .custom-unlocked-content::before { content: "已解锁 ✅"; /* 标签文字,可以用图标字体更美观 */ position: absolute; top: 0.75rem; right: 0.75rem; background-color: #38a169; color: white; padding: 0.25rem 0.75rem; border-radius: 20px; font-size: 0.75rem; font-weight: 600; } /* 解锁内容的内部元素样式 */ .custom-unlocked-content p, .custom-unlocked-content div, .custom-unlocked-content ul, .custom-unlocked-content ol { color: #2d3748; /* 保持内容文字清晰可读 */ /* 其他样式继承主题,确保内容正常显示 */ } /* 解锁动画 */ @keyframes fadeInUp { from { opacity: 0; transform: translateY(10px); } to { opacity: 1; transform: translateY(0); } } /* 响应式设计:在移动设备上调整内边距和标签位置 */ @media (max-width: 768px) { .custom-unlocked-content { padding: 1.5rem; margin: 2rem 0; } .custom-unlocked-content::before { top: 0.5rem; right: 0.5rem; font-size: 0.7rem; } } /*e-secret 文章部分内容输入密码可见css 结束*/第三步:使用短码如何实现?在编辑文章时使用短码包围要隐藏的内容,如下即可。隐藏内容,请前往内页查看详情{dotted startColor="#ff6c6c" endColor="#1989fa"/}未输入密码时候预览图如下密码输入错误时预览图如下输入正确密码后显示隐藏的内容预览图如下结语感觉有个bug,就是同一篇文章放两个不一样的密码的内容,正确一个另外一个会提示错误,反正就是错误一个两个都会提示错误,能用就行,后面有时间再改吧!
 -
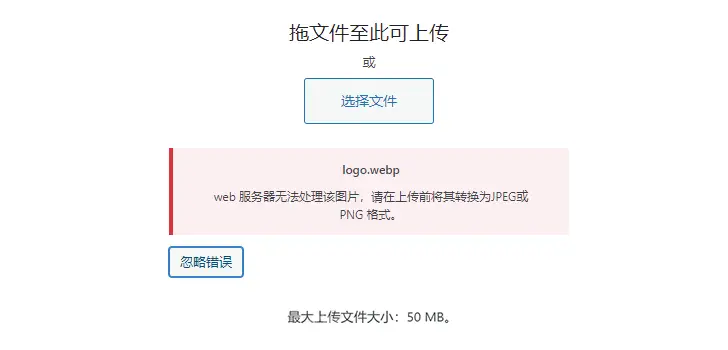
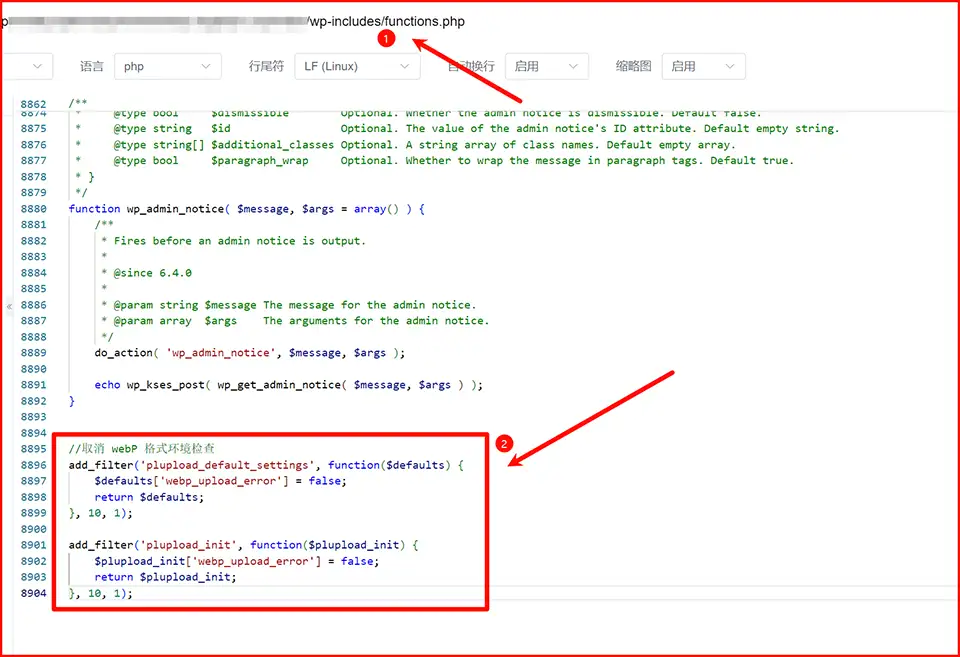
wordpress上传webp图片提示“Web服务器无法处理该图片,请在上传前将其转换为JPEG或PNG格式”解决方法 前言WordPress某些版本或服务器在写文章时上传webp图片的时候提示无法处理该图片导致图片无法上传。{alert type="success"}web服务器无法处理该图片,请在上传前将其转换为 JPEG 或 PNG 格式。{/alert}WordPress官方版本日志显示ver 5.8 版本开始就已经支持webp格式。解决方法1、用ftp工具上传到服务器,然后在写文章的时候引用;2、在WordPress的wp-includes目录下打开functions.php文件添加如下代码://取消 webP 格式环境检查 add_filter('plupload_default_settings', function($defaults) { $defaults['webp_upload_error'] = false; return $defaults; }, 10, 1); add_filter('plupload_init', function($plupload_init) { $plupload_init['webp_upload_error'] = false; return $plupload_init; }, 10, 1);代码的作用就是屏蔽webP 格式环境检查,直接上传。直接把代码添加到functions.php文件的最后保存即可。经过验证此方法完美解决了wordpress上传webp图片提示“Web服务器无法处理该图片,请在上传前将其转换为JPEG或PNG格式”的错误。
-
zibll 子比主题6.92 免授权 使用方法:1.解压HttpRequest.zip2.将HttpRequest.php复制到主题/zibll/vendor/yurunsoft/yurun-http/src目录下zibll子比主题6.92:{sub}下载地址:https://url08.ctfile.com/f/811508-1316511143-5ebbae?p=3100 (访问密码: 3100)备用地址1:http://mr.ssr0.cn:8000/FTP/zibll-V6.9.2(2240).zip备用地址2:https://sgdhuo.lanzouq.com/ihpbS23e63xc{/sub}授权文件:隐藏内容,请前往内页查看详情
-
模板兔V9.1免授权版 简介如果你要做一个付费看视频电影的网站,或做一个付费下载音乐并且带试听的音频网站,或做一个虚拟资源团购下载网站,都可使用本主题!说明{alert type="success"}主题已去除域名限制,已解密所有加密的文件9.1版本是2024.01.24更新{/alert}模板兔V9.1免授权版下载地址{sub}{cloud title="模板兔9.1" type="lz" url="https://sgdhuo.lanzouq.com/ivmnx2342smh" password=""/}{cloud title="模板兔9.1" type="ct" url="https://url08.ctfile.com/f/811508-1316068591-511902?p=3100" password="3100"/}{/sub}
-
7B2 PRO主题5.4.2免授权操作教程及下载 {alert type="info"}B2 PRO 5.4.2 最新免授权版不再需要改hosts,和正版一样上传安装就可以激活。{/alert}B2 PRO 5.4.2下载地址:{sub}{cloud title="B2 PRO 5.4.2" type="ct" url="https://url08.ctfile.com/f/811508-1272409429-e179bd" password="3100"/}{cloud title="B2 PRO 5.4.2" type="lz" url="https://sgdhuo.lanzouq.com/iF6xl21vqzwd" password="无"/}{/sub}{dotted startColor="#ff6c6c" endColor="#1989fa"/}以下是5.2.0版本hosts方式绕过{alert type="info"}需要本地搭建1个伪授权站{/alert}5.2.0原版主题:{sub}{cloud title="b2 5.2.0原版主题" type="default" url="https://url08.ctfile.com/f/811508-1272409423-f859ca" password="3100"/}{cloud title="b2 5.2.0原版主题" type="default" url="https://sgdhuo.lanzouq.com/i4VqI21vrbud" password="无"/}{/sub}宝塔参考: 教程-子比主题7.6版本绕过授权伪站搭建(以apache2为例)1.www下新建7b2目录, 添加index.php文件:{sub}<?php $url = $_SERVER['REQUEST_URI']; header('Content-Type: application/json; charset=UTF-8'); if(strpos($url, '/check/verify') !== false){ if(empty($_POST['d']) || empty($_POST['u']) || empty($_POST['t'])) exit('0'); $str = $_POST['t'].'.b2_token_token'.$_POST['u'].$_POST['d']; $encstr = authcode($str, 'ENCODE', $_POST['t']); $encstr = base64_encode($encstr); $encarr = str_split($encstr); $saltarr = str_split('b2file'); for($i=0;$i<count($saltarr);$i++){ $encarr[$i] = $encarr[$i].$saltarr[$i]; } $result = implode('', $encarr); exit($result); } function authcode($string, $operation = 'DECODE', $key = '', $expiry = 0) { $ckey_length = 4; $key = md5($key); $keya = md5(substr($key, 0, 16)); $keyb = md5(substr($key, 16, 16)); $keyc = $ckey_length ? ($operation == 'DECODE' ? substr($string, 0, $ckey_length): substr(md5(microtime()), -$ckey_length)) : ''; $cryptkey = $keya.md5($keya.$keyc); $key_length = strlen($cryptkey); $string = $operation == 'DECODE' ? base64_decode(substr($string, $ckey_length)) : sprintf('%010d', $expiry ? $expiry + time() : 0).substr(md5($string.$keyb), 0, 16).$string; $string_length = strlen($string); $result = ''; $box = range(0, 255); $rndkey = array(); for($i = 0; $i <= 255; $i++) { $rndkey[$i] = ord($cryptkey[$i % $key_length]); } for($j = $i = 0; $i < 256; $i++) { $j = ($j + $box[$i] + $rndkey[$i]) % 256; $tmp = $box[$i]; $box[$i] = $box[$j]; $box[$j] = $tmp; } for($a = $j = $i = 0; $i < $string_length; $i++) { $a = ($a + 1) % 256; $j = ($j + $box[$a]) % 256; $tmp = $box[$a]; $box[$a] = $box[$j]; $box[$j] = $tmp; $result .= chr(ord($string[$i]) ^ ($box[($box[$a] + $box[$j]) % 256])); } if($operation == 'DECODE') { if(((int)substr($result, 0, 10) == 0 || (int)substr($result, 0, 10) - time() > 0) && substr($result, 10, 16) == substr(md5(substr($result, 26).$keyb), 0, 16)) { return substr($result, 26); } else { return ''; } } else { return $keyc.str_replace('=', '', base64_encode($result)); } }{/sub}2.添加伪静态.htaccess文件:<IfModule mod_rewrite.c> Options +FollowSymlinks RewriteEngine On RewriteCond %{REQUEST_FILENAME} !-d RewriteCond %{REQUEST_FILENAME} !-f RewriteRule ^(.*)$ index.php/$1 [QSA,PT,L] </IfModule>3.添加VirtualHost:nano /etc/apache2/sites-enabled/000-default.conf ## 添加7b2.com <VirtualHost *:80> ServerAdmin webmaster@localhost ServerName 7b2.com DocumentRoot /var/www/zibll ErrorLog ${APACHE_LOG_DIR}/error.log #CustomLog ${APACHE_LOG_DIR}/access.log combined </VirtualHost> nano /etc/apache2/sites-enabled/4.添加HTTPS,SSL用自签证书:cd /etc/apache2/ssl # 私钥文件 openssl genrsa -out private.key 2048 ## 证书请求文件 默认回车即可 openssl req -new -key private.key -out server.csr ## 自签名证书 openssl x509 -req -days 365 -in server.csr -signkey private.key -out server.crt nano /etc/apache2/sites-enabled/default-ssl.conf ## 添加7b2.com <VirtualHost *:443> ServerAdmin webmaster@localhost ServerName 7b2.com DocumentRoot /var/www/7b2 LogLevel error SSLEngine on SSLCertificateFile /etc/apache2/ssl/server.crt SSLCertificateKeyFile /etc/apache2/ssl/private.key </VirtualHost>5.去除wordpress SSL验证:nano /var/www/wordpress/wp-includes/class-wp-http.php # 209 行 'sslverify' => true, 改成 false 'sslverify' => false,6.修改hosts:nano /etc/hosts # 添加 127.0.0.1 7b2.com service apache2 restart7.登录后台,会员号随便填写,点击授权
-
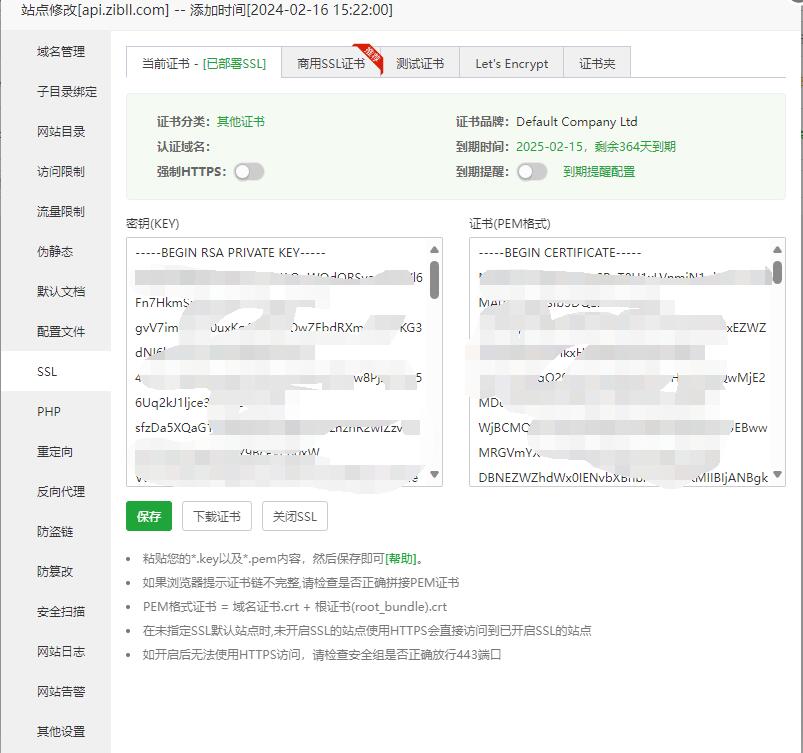
子比主题7.7版本绕过授权教程操作步骤 更新7.7版本(2024-04-15)伪站文件,搭建方法没变{sub}<?php $url = $_SERVER['REQUEST_URI']; function getRandom($length) { $characters = 'abcdefghijklmnopqrstuvwxyz1234567890'; $randomString = ''; for ($i = 0; $i < $length; $i++) { $index = rand(0, strlen($characters) - 1); $randomString .= $characters[$index]; } return $randomString; } function generate_randstr($url) { $key = strrev(md5($url)); $num1 = rand(70,99); $num1r = strrev(strval($num1)); $num2 = rand(70,99); $num2r = strrev(strval($num2)); $key = substr($key,23).substr($key,0,23); $keystr = substr_replace($key,getRandom(3),$num1-69,0); $randstr = getRandom(3).$num1r.getRandom(rand(5,10)).$keystr.getRandom(100-$num2).$num2r; return $randstr; } header('Content-Type: application/json; charset=UTF-8'); if(strpos($url, '/api/auth') !== false){ $time = time(); $token = md5(uniqid(mt_rand(), true) . microtime()); $randstr = generate_randstr($_POST['url']); $sign = md5($randstr.$time.$token.'ok'); $data = ['error'=>true, 'error_code'=>0, 'msg'=>'', 'time'=>$time, 'token'=>$token, 'randstr'=>$randstr, 'code'=>base64_encode('恭喜您,授权验证成功'), 'sign'=>$sign]; echo json_encode($data); } elseif(strpos($url, '/api/update') !== false){ $version = $_POST['version']; $data = ['result'=>false, 'aut_error'=>false, 'msg'=>'暂无更新,您当前的版本已是最新版', 'version'=>$version]; echo serialize($data); }{/sub}7.7主题文件:{sub}{cloud title="zibll-V7.7" type="lz" url="https://sgdhuo.lanzouq.com/iBHKk21voegj" password="无"/}{cloud title="zibll-V7.7" type="ct" url="https://url08.ctfile.com/f/811508-1272409417-22ebbb" password="3100"/}{/sub}{dotted startColor="#ff6c6c" endColor="#1989fa"/}7.6 版本(2024-02-01)绕过授权{alert type="warning"}需要本地搭建1个伪授权站{/alert}7.6原版主题:{sub}{cloud title="zibll-V7.6" type="lz" url="https://sgdhuo.lanzouq.com/iRlMZ21vot2f" password="无"/}{cloud title="zibll-V7.6" type="ct" url="https://url08.ctfile.com/f/811508-1272409426-9fdf75" password="3100"/}{/sub}伪站搭建 (以apache2为例)1.www下新建zibll目录, 添加index.php文件:{sub}<?php $url = $_SERVER['REQUEST_URI']; function getRandom($length) { $characters = 'abcdefghijklmnopqrstuvwxyz1234567890'; $randomString = ''; for ($i = 0; $i < $length; $i++) { $index = rand(0, strlen($characters) - 1); $randomString .= $characters[$index]; } return $randomString; } function generate_randstr($url) { $key = strrev(md5($url)); $num1 = rand(70,99); $num1r = strrev(strval($num1)); $num2 = rand(70,99); $num2r = strrev(strval($num2)); $key = substr($key,22).substr($key,0,22); $keystr = substr_replace($key,getRandom(3),$num1-69,0); $randstr = getRandom(3).$num1r.getRandom(rand(5,10)).$keystr.getRandom(100-$num2).$num2r; return $randstr; } header('Content-Type: application/json; charset=UTF-8'); if(strpos($url, '/api/auth') !== false){ $time = time(); $token = md5(uniqid(mt_rand(), true) . microtime()); $randstr = generate_randstr($_POST['url']); $sign = md5($randstr.$time.$token.'ok'); $data = ['error'=>true, 'error_code'=>0, 'msg'=>'', 'time'=>$time, 'token'=>$token, 'randstr'=>$randstr, 'code'=>base64_encode('恭喜您,授权验证成功'), 'sign'=>$sign]; echo json_encode($data); } elseif(strpos($url, '/api/update') !== false){ $version = $_POST['version']; $data = ['result'=>false, 'aut_error'=>false, 'msg'=>'暂无更新,您当前的版本已是最新版', 'version'=>$version]; echo serialize($data); }{/sub}2.添加伪静态.htaccess文件:<IfModule mod_rewrite.c> Options +FollowSymlinks RewriteEngine On RewriteCond %{REQUEST_FILENAME} !-d RewriteCond %{REQUEST_FILENAME} !-f RewriteRule ^(.*)$ index.php/$1 [QSA,PT,L] </IfModule>3.添加VirtualHost:nano /etc/apache2/sites-enabled/000-default.conf ## 添加api.zibll.com <VirtualHost *:80> ServerAdmin webmaster@localhost ServerName api.zibll.com DocumentRoot /var/www/zibll ErrorLog ${APACHE_LOG_DIR}/error.log #CustomLog ${APACHE_LOG_DIR}/access.log combined </VirtualHost> nano /etc/apache2/sites-enabled/4.添加HTTPS,SSL用自签证书:cd /etc/apache2/ssl # 私钥文件 openssl genrsa -out private.key 2048 ## 证书请求文件 默认回车即可 openssl req -new -key private.key -out server.csr ## 自签名证书 openssl x509 -req -days 365 -in server.csr -signkey private.key -out server.crt cat server.crt private.key > server.pem nano /etc/apache2/sites-enabled/default-ssl.conf ## 添加api.zibll.com <VirtualHost *:443> ServerAdmin webmaster@localhost ServerName api.zibll.com DocumentRoot /var/www/zibll LogLevel error SSLEngine on SSLCertificateFile /etc/apache2/ssl/server.crt SSLCertificateKeyFile /etc/apache2/ssl/private.key </VirtualHost>BT搭建伪授权站1.创建api.zibll.com网站,将上面index.php添加到网站目录2.网站设置->SSL添加自签证书private.key和server.pem3.添加伪静态4.伪静态代码location / { try_files $uri $uri/ /index.php?$query_string; }5.修改hosts:nano /etc/hosts # 添加 127.0.0.1 api.zibll.com service apache2 restart6.登录后台,点击授权{alert type="info"}zibll子比主题V6.5更新就带来了全新的卡密充值功能,zibll子比主题更新V7.4后,新增卡密兑换会员、卡密兑换积分的功能。{/alert}
-
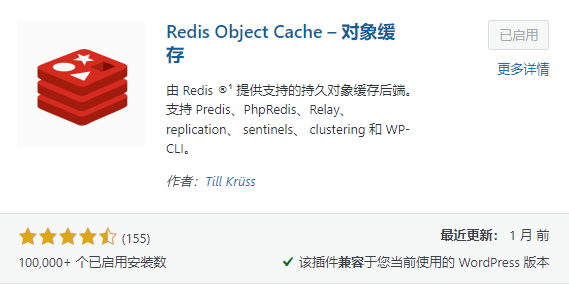
1panel面板WordPress启用Redis的设置方法 下面为大家写一个以1panel面板为例,在WordPress系统中配置Redis的基本步骤:1、在WordPress插件安装商城安装Redis Object Cache插件,然后进入插件管理启动插件就不赘述了;提示:服务器没配置好Redis,在WordPress的插件管理里面是启动不了Redis Object Cache插件的。2、在1Panel面板的PHP运行环境的扩展里面添加redis;PHP扩展路径:左侧菜单栏【网站】》【运行环境】》【编辑】》【扩展】,在扩展下拉框里面找到redis点击加入扩展列表3、在1panel面板的应用商店安装Redis4、在wp-config.php里增加了以下代码define('WP_REDIS_HOST', 'redis'); define('WP_REDIS_PORT', '6379'); define('WP_REDIS_DATABASE', '0'); define('WP_REDIS_PASSWORD', 'redis的密码');//redis的密码此时多半会有类似以下的报错:{alert type="info"}Error establishing a Redis connectionWRONGPASS invalid username-password pair or user is disabled................{/alert}5、wp这个插件有点迷,升级后总会遇到奇奇怪怪的问题,没事不要升级。除了wp 的config 定义一下以外,我们还需要编辑WordPress的一个文件,路径为/wp-content/object-cache.php这个文件,大约在行624行左右参考以下修改:protected function build_parameters() { $parameters = [ 'scheme' => 'tcp', 'host' => 'redis', 'port' => 6379, 'password' => 'redis的密码',//直接填写你的redis的密码 //这里最重要的是修改'host'字段值为'redis',因为是docer容器的地址; //还要添加一个'password' => 'redis的密码';修改完成后就可以完美运行!!!参考地址:https://bbs.fit2cloud.com/t/topic/2224